Case Report
Preventing Peri-implantitis with a proper Cementation Protocol and with the consideration of alternatives to Cement-Retained Implant Restorations

Tony Daher1*, Robert G Mokbel2 and Vahik P Meserkhani3
1Private Practice Limited to Prosthodontics and Implant Dentistry, La Verne, California, USA
2Private Practice Limited to Prosthodontics and Implant Dentistry, Fountain Valley, California, USA
3Private Practice Limited to Prosthodontics and Implant Dentistry, Glendale, California, USA
*Address for Correspondence: Tony Daher, Private Practice Limited to Prosthodontics and Implant Dentistry, La Verne, California, USA, Email: [email protected]
Dates: Submitted: 23 October 2018; Approved: 25 October 2018; Published: 26 October 2018
How to cite this article: Daher T, Mokbel RG, Meserkhani VP. Preventing Peri-implantitis with a proper Cementation Protocol and with the consideration of alternatives to Cement-Retained Implant Restorations. J Clin Adv Dent. 2018; 2: 008-017. DOI: 10.29328/journal.jcad.1001007
Copyright License: © 2018 Daher T, et al. This is an open access article distributed under the Creative Commons Attribution License, which permits unrestricted use, distribution, and reproduction in any medium, provided the original work is properly cited
Keywords: Dental implants; Implant restorations; Prosthetics; Implant cementation; Angled screw channel; Dynamic screw channel; Lingual set of screws
Abstract
Successful implant restoration is depending on an adequate surgical and prosthetic protocol. In the last few years an increase in Peri-Implantitis has been attributed, in part, to the excess cement left around the implant collar and threads, leading in many cases to bone loss and even the complete failure of the implant treatment [1-5].
This article will attempt: 1. To describe a proper cementation protocol for cement-retained implant restorations to reduce cement induced implant failures, and 2. To review the alternative implant restorative options to cement-retained crowns such as screw-retained restorations, screwless and cementless implant restorations, screw-retained-cemented implant crown, angulated screw channel restorations, the lingual locking screw-retained restorations and the multi-unit abutment restorations.
Introduction
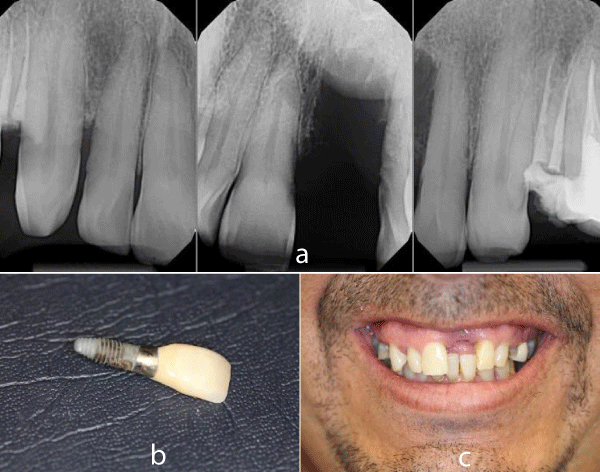
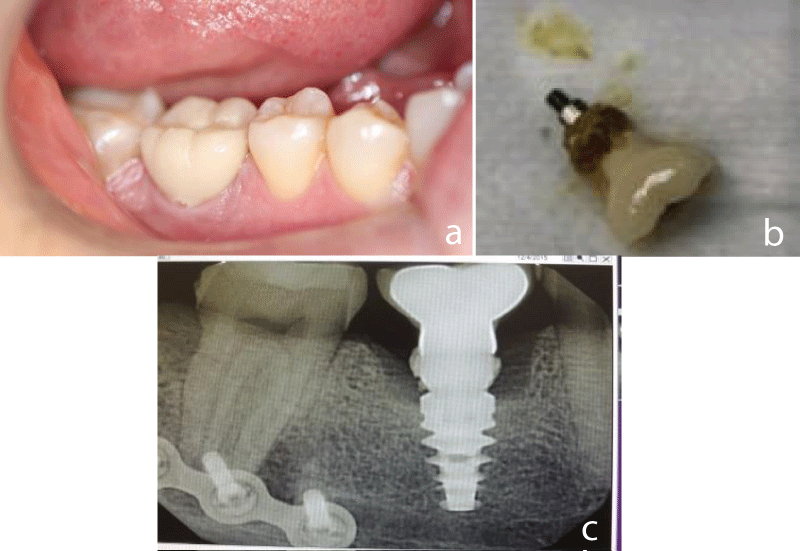
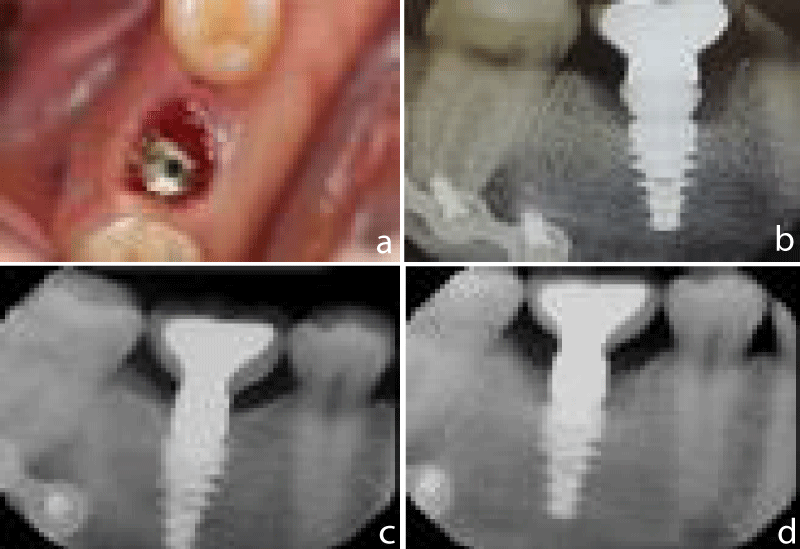
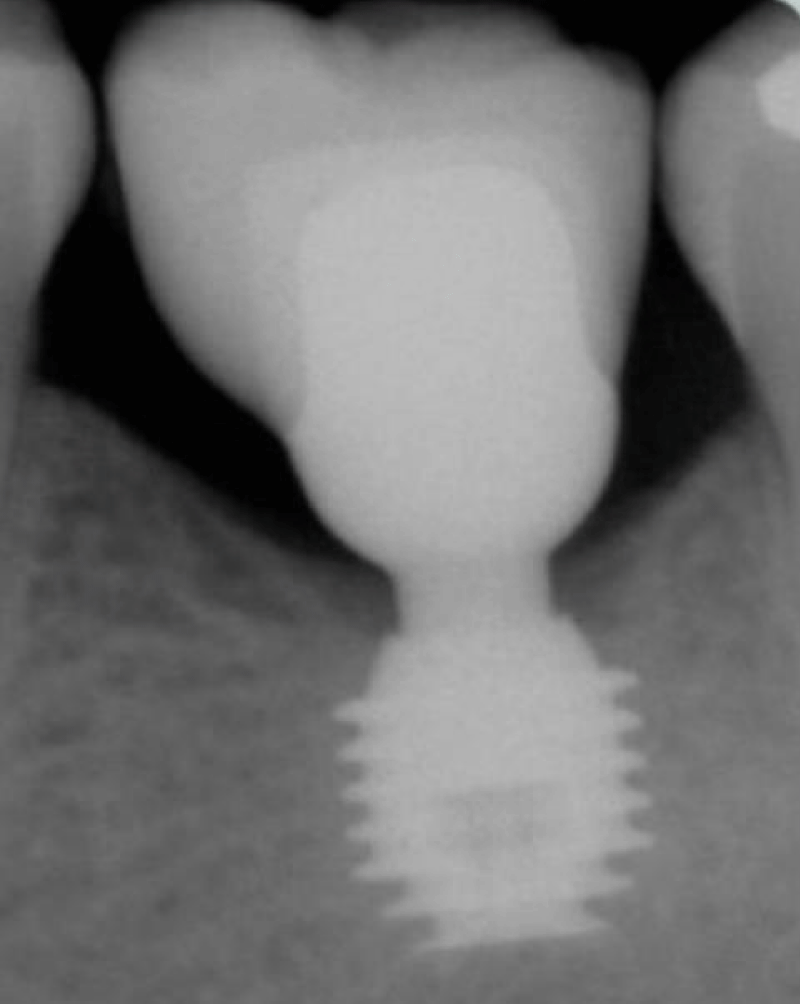
The dental implant should be placed in an optimum position according to the predetermined prosthetic restoration. A Screw-Retained Implant Crown (SRIC) is mostly desirable when possible [4]. When an implant is not adequately placed, and the access hole does not end up in the middle of the occlusal surface or to the lingual of the incisal edge, an implant cement-retained restoration is commonly indicated. Residual excess cement after placement of single or fixed partial dentures has been associated with clinical and radiographic signs of peri-implant disease in 81% of the cases [4] (Figure 1). Once the residual excess cement is removed surgically with the administration of an antibiotherapy regimen, clinical signs of the peri-implantitis will resolved in 74% of the tested implants (Figures 2,3). During the cementation of such restorations, it was demonstrated that a risk of leaving excess cement behind in the implant gingival cuff exists [4].
Figure 1: a-c. Excess cement left behind after a cementation procedure, can be very difficult to remove and may cause bone loss and eventually the loss of the implant.
Figure 2: Residual excess cement is associated with clinical and radiographic signs of periimplantitis.
Figure 3: a) The crown and abutment was removed, b,c) then residual cement was removed and Nd-Yag Laser treatment was administered. Antibiotherapy was administered and the crown placed back. d) 2-year post operatory recovery radiograph showed complete recovery.
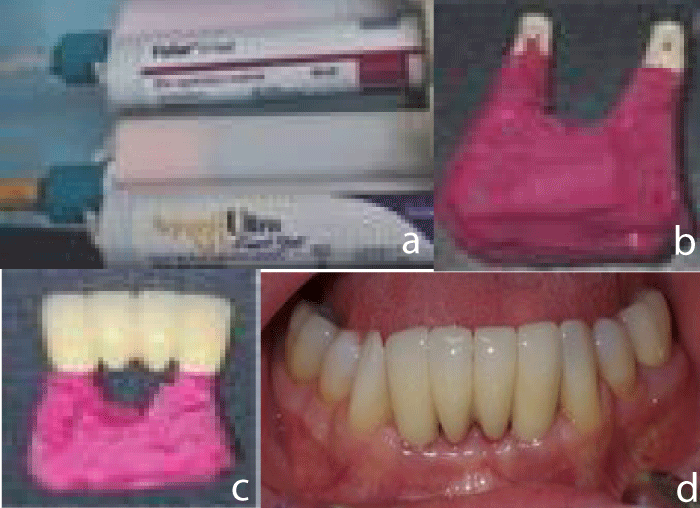
When a cement-retained implant restoration is indicated, an adequate cementation protocol must be followed so no excess cement is wedged in the implant gingival sulcus [3] (Figure 4).
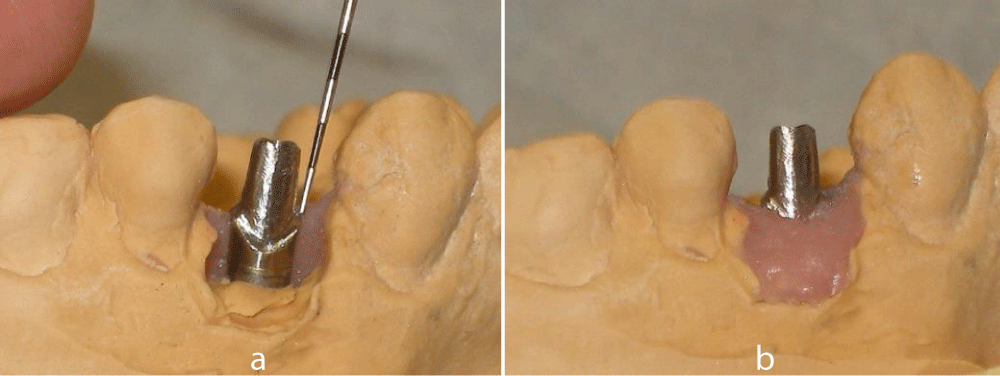
For a successful cement-retained implant restoration, it was demonstrated that the presence of adequate thick and attached gingiva, an adequate abutment margin placement at or above the gum level (Figures 5,6), an adequate abutment height and taper for proper resistance and retention form, (Figure 6), and adequate cementation protocol as described below (Figure 4).
Figure 5: In the esthetic zone a cemented implant restoration is often required. Abutment margins are kept at or slightly under the gingival margins.
Figure 6: In the posterior quadrant when a cemented implant restoration is required. b- Abutment margins are kept at or above the gingival margins.
Implant restoration cementation protocol [3] (Figure 4)
Once the restoration has been adjusted, then its seating is confirmed with a radiograph and approved by the patient, the cementation process proceeds as follows:
1. Fabricate a chairside duplicate abutment using a PVS bite registration material. Squirt the PVS bite material inside the crown and form a handle-base outside the crown(s).
2. Place the implant abutment over the implant in the patient mouth, using a new clinical screw, torque it to implant company specification. (Most companies recommend 30 to 35 Ncm).
3. The screw should be allowed to relax for 10 min. to reduce deformation elongation. Then the screw is unscrewed and then torqued a second time before proceeding with the cementation procedure.
4. If the margins of the custom or milled abutment are subgingival (often on the facial), tacking a cord around the neck of the abutment can help catch most of the cement that may still leak inside the sulcus.
5. Fill the crown with a radio-opaque cement such as Temp-Bond after cleaning the crown intaglio surface(s) with alcohol and seat fully the abutment duplicate(s) into the crown(s). This will remove most excess cement outside the mouth. Keep in mind that you need to work fast.
6. Add a tiny dap of temporary cement inside the crown at the gingival area then seat the crown on the abutment, clean any excess and remove the cord.
7. Make a final periapical radiograph for verification purposes.
Alternative options to the cement-retained implant restorations
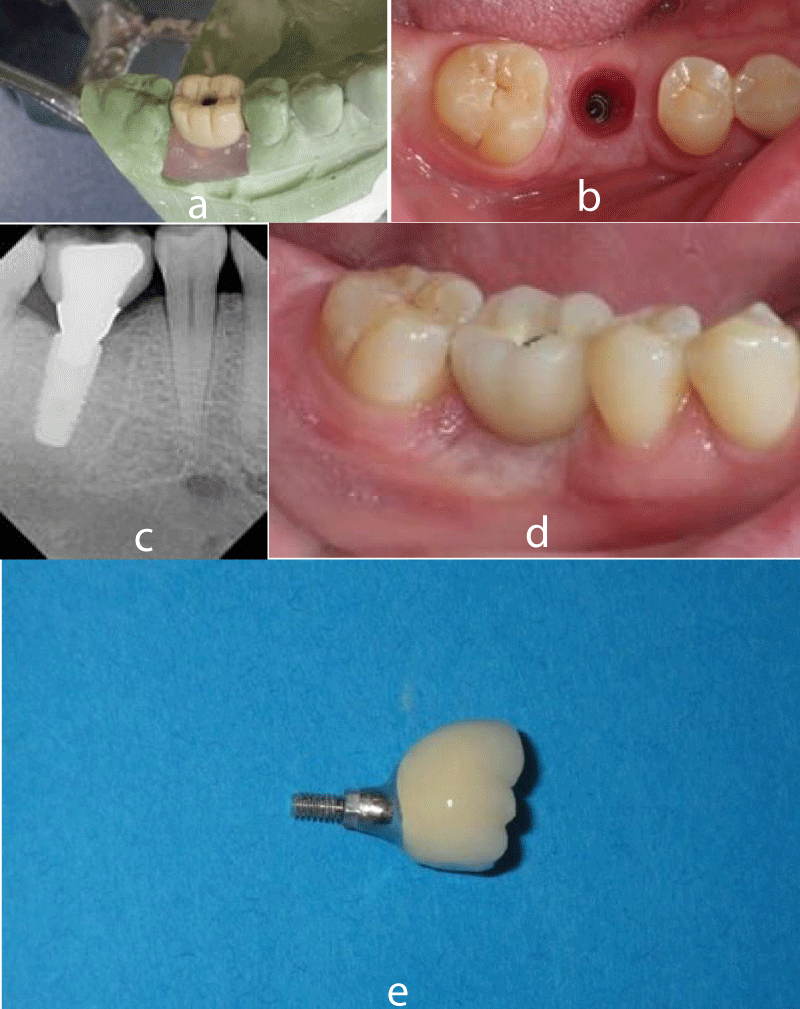
Screw-Retained Implant Restorations (Figure 7): A well-placed implant will allow appropriate contours of the restoration and the access hole for a screw retained restoration will be placed in either on the occlusal or lingual surfaces. This will result in a functional and esthetic restoration. Weber et al. [6], in a prospective clinical study, evaluated the plaque index (MPI), sulcus bleeding index (SBI), keratinized mucosa (KM), gingival level (GL), around fifty-nine crowns (38.82%) were cement retained, while 93 (61.18%) crowns were screw retained, during a 3-year follow-up period following prosthetic rehabilitation, they found that peri-implant soft tissues responded more favorably to screw-retained crowns when compared with cement-retained crowns. However, no soft-tissue recession was observed in either type of crowns. Cement-retained crowns were preferred by dentists, while patients were equally satisfied with either type of crowns they received.
Figure 7: Screw-Retained Implant Crown protocol. a) Implant level impression is made, using a UCLA Abutment full contoured wax pattern is made. A silicone index is used to verify the wax cut back. Then wax cut back is done to adequately leave optimum ceramic thickness 1.5-2mm. b) photo of the clinical implant site. c, d, e) Radiograph and clinical photos of the screw retained crown in place.
A systematic review of screw versus cement-retained implant-supported fixed restorations study by Sherif et al. [7] showed that “there is no significant difference between cement- and screw-retained restorations for major and minor outcomes with regard to implant survival or crown loss. This is important data, as clinicians use both methods of restoration, and neither is a form of inferior care.”
Screwless and Cementless Implant Restorations (Figure 8): The Integrated Abutment Crown (IAC) (Bicon, LLC.) [8], is an implant restoration where the implant abutment and the crown material are one unit. The abutment-crown complex is connected to the implant with a locking taper. This technique does not use cement to retain the crown or screws to retain the abutment.
Urdaneta et al. [9], conducted a 3-year retrospective cohort study and found that the clinical outcome of this screwless and cementless system for the single implant restorations compares favorably with the experience of screw- and cement- retained restorations within the observation period.
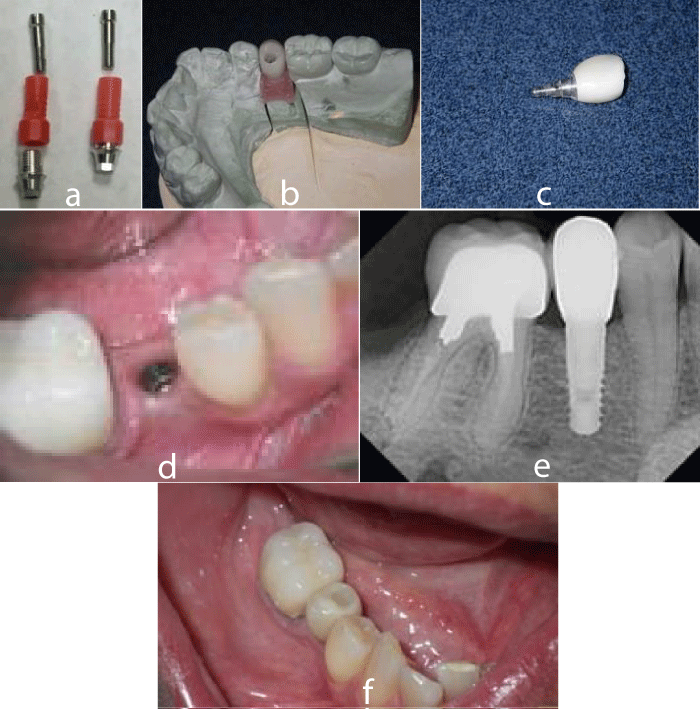
The Screw Retained–Cemented Implant Crown (SR-CIC) (Figure 9): This procedure eliminates the cement interface inside the mouth, and avoid the pitfalls of cementation, and renders affordable the implant restoration a screw- retained type. A Ti-base and CAD/CAM or stock abutment achieve these objectives.
Figure 9: Screw Retained–Cemented Implant Crown (SR-CIC) protocol. a) Ti-base of UCLA abutment (dentisusa.com) was used after heat removing the red plastic sleeve and was placed over the lab analogue. b) A zirconia crown veneered with e-max ceramic was fabricated over Ti-base. c) resin cement was used to cement it over the Ti base d) Intraoral photo of the DENTISTM S-Clean implant. e) Radiograph of the implant crown on implant of the mandibular right second premolar. f) The “hybrid” implant crown place and torqued in the mouth.
The objective is to fabricate a regular crown with a hole that fits over the prepared stock abutment (similar to a custom-abutment). The custom abutment or UCLA type abutment is more expensive then the stock abutment procedure. The cost of the SR-CIC is comparable to a regular cemented crown over a stock abutment. This technique provides the same outcome as the UCLA type abutment with being less expense.
The procedure is a follow: 1. A custom abutment, a Titanium-base of a UCLA abutment or a prepared stock abutment, is fabricated, or selected, or milled in the lab or in the office. The abutment margins can be juxta-gingival or subgingival, especially in the esthetic areas. Sandblast, and if necessary, apply an opaquer onto the abutment in case of an all ceramic.
2. A crown with an access hole is fabricated using the normal procedure or the CAD/CAM technology (chairside) with the material of choice (Metallo-ceramic, E-max, or Zirconia).
3. Make any necessary adjustment to fit and adapt the 2-pieces together.
4. Silane the crown as needed and cement outside the mouth using a resin cement keeping the crown access hole free of cement as much as possible.
5. Remove all excess cement outside the mouth and polish the assembled abutment crown.
6. Try-in and torque the SR-CIC as required. Verify seating with an X-ray.
7. Fill the access hole with a Teflon tape or with a light PVS plug and seal it with an appropriate bonded composite restoration. Cotton pellet should never be used as the potential of bacterial.
The screw-retained implant restoration using Angulated Screw Channel (ASC) or the Dynamic Screw Channel (DSC) concept (Figures 10,11)
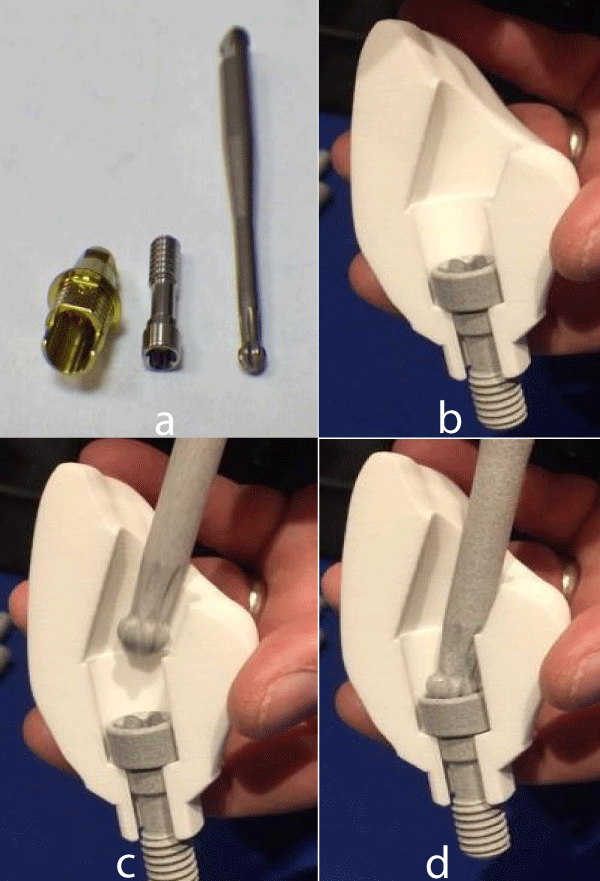
Figure 10: Dynamic screw access channel parts: a) Titanium base with its screw and screw driver from Preat Corp. (www.preat.com). b) Cross section of an anterior crown where an Dynamic Angulated Screw Channel (DASC) ase is used. The DASC implant screw in position. c) Screw driver accessing the screw head. d) The screw driver engaging the screw head. (Courtesy of Preat Corporation; www.preat.com; DASC can correct angulation up to 25 with its 3.0 hexa-lobular screw and its screw driver.
Figure 11: a) Moving the screw access hole from an incisal position with the use of DASC to a more b) lingual position.
When the implant is mal-positioned, the access hole for a screw retained restoration would be esthetically unacceptable. In this situation a cement retained restoration is indicated. One way to reduce the dependence on the cement-retained restoration when a screw-retained restoration is not feasible, is the Angled Screw Channel (ASC) abutment or the Dynamic Screw Channel (DSC) abutment (Figure 9), rendering the placement of the screw opening at the lingual surface or at the occlusal surface.
The Dynamic Abutment system developed by Talladium International implantology10 consists of two pieces connected together by an elbow that works as a joint, the system has full freedom of movement in circumference between 0° and 20°. In 2004, an abutment called the Dynamic Abutment (Talladium International Implantology) became commercially available. This abutment can allow a deviation of the restoration screw access angle to the implant angle of up to 28 degrees. This will allow a screw-retained restoration to be connected directly to the implant.
The purpose of using a ASC or DSC is to move the anterior screw access hole lingually (Figure 11) or to move the posterior screw access opening towards the middle of the occlusal surface rendering the restoration a screw-retained restoration. The technique is as follows:
1. Fabricate a master cast from an implant level impression.
2. Order a dynamic angulated screw channel Titanium-Base abutment or a UCLA Dynamic abutment.
3. Mill a Zirconia crown and cement it over Ti-base abutment. When a metallo-ceramic restoration is indicated, use a dynamic UCLA abutment (from Preat Corp.), do a full-contoured wax pattern, then make a silicone index, followed by a wax cut-back making less than a 2mm of space for ceramic application. Cast the wax pattern with precious metallo-ceramic alloy, then apply porcelain.
4. Use the corresponding screw and the corresponding screw driver for the Dynamic or Angulated Screw Channel, torque it to 25Ncm.
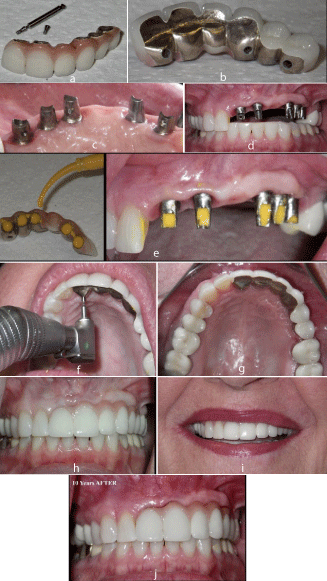
The lingual locking screw for implant-retained restorations [11] (Figure 12)
Figure 12: Lingual set of screws on a 6 units prosthesis for a clinical situation. a) 6 units of screw-retained prosthesis with 3 sets of lingual screws. b) Lingual view of the prosthesis. c) Lingual view of corresponding CAD-CAM abutments. d) Frontal view of the abutments in patient’s mouth. e) The abutment access holes are plugged with light viscosity poly-vinyl siloxane (PVS). f) the prosthesis is filled with the same PVS and placed over abutments and the 3 sets of lingual screws are tighten in. g,h,i) Different views of the prosthesis. j) Frontal view of the prosthesis after 10 years.
The advantage of implant-borne screw-retained prostheses is the ability to retrieve it. The removal of cement-retained implant crowns has often proven difficult due to a multitude of variables, including locating the access and stripped screws and save-guarding the underlying custom abutment. To facilitate its removal a photo of the abutment is made before cementing the crown over. This photo is kept in patient chart to help locate the access hole and retrieve the restoration when it is needed [12] (Figure 13). A better way that it is available to the practicing dentist is the use of a vertically or horizontally secondary screw to lock the implant crown superstructure to the implant abutment. The concept of a secondary locking horizontal screw [11] or the cross-pin12 at the crown level allows latitude in fixture position, good aesthetics, and especially retrievability (Figure 12).
Figure 13: a,b) Photos of the abutment are made before cementing the crown over. These photos are kept in patient chart to help locate the access hole and retrieve the restoration when it is needed later.
The technique of lingual set screw is well described at www.preat.com. The cross-pin technique is described in the article of Gervais MJ et al. [13].
The general principles in using either technique, are as follow:
1. These screws are smaller than the abutment screws and not able to withstand occlusal forces without the abutment protection. Designing the abutment in a manner to provide optimum resistance and retention form is a must. This provides protection to the lingual screws against destructive shearing forces.
2. The lab technician must provide a lingual location with an easy clinical access for the placement of the lingual screw. For example, the cingulum area of the anterior teeth, the lingual surfaces of the maxillary and mandibular premolars and maxillary molars and mesio-lingual angle of the mandibular molars due to the position of the tongue.
3. It is imperative to establish the final shape of the prosthesis early for proper abutment design and contour. This can be established by providing a full contoured wax patterns of the final restoration on a cast or digitally on a computer.
4. A medical silicone or just a light viscosity polyvinyl siloxane is used to seal the space between the crown and the abutment during placement procedure. This will prevent any seepage of food in that space. Then the lingual screw(s) will secure the prosthesis to the abutment(s).
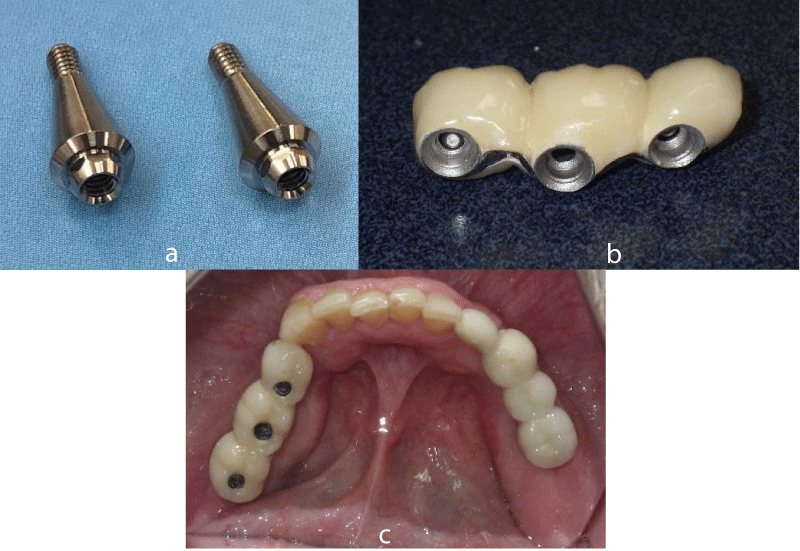
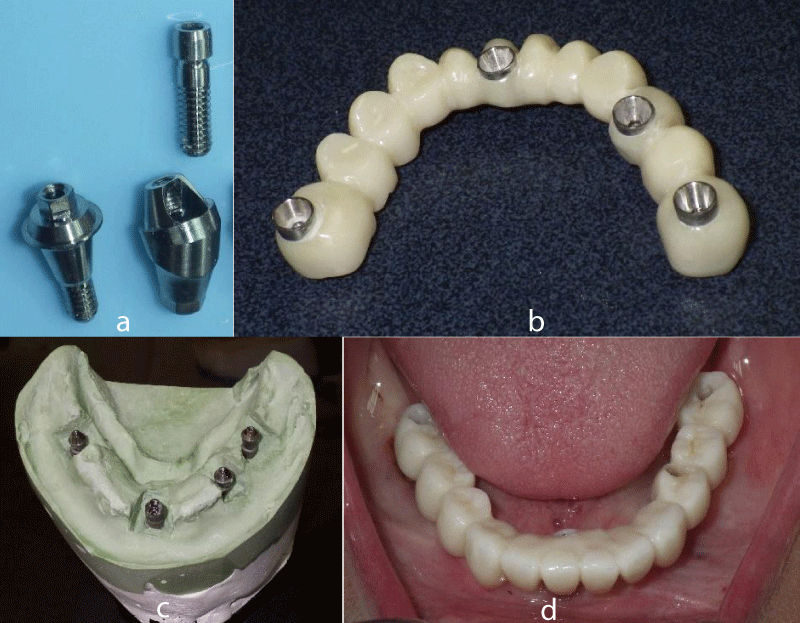
The use of multi-unit abutment to overcome mal-aligned implants: When multiple implants are misaligned in the posterior quadrants, multi-unit (MU) abutments could be used to overcome the misalignment by moving the implant internal connection to a taper external connection and render the restoration screw-retained (Figure 14). By using such abutments, the occlusal stress will be moved from the implant screw to the MU abutment small screw. In case of the prosthesis small screw breaks, it is easily replaced and even the MU abutment can be removed and replaced with a similar one. The prosthesis is placed back over. These abutments can be either straight or angulated types are used especially for 4-implant screw-retained prosthesis concept (Figure15).
Figure 14: Multi-unit (Octa) abutments for a partially edentulous situation. a) 2 DentisTM multi-unit octa type abutments. b) 3 Implant connected screw-retained crowns over octa type abutments. c) Occlusal view of the prosthesis in place.
Figure 15: a) Photo of a straight and angled MU abutments (www.Dentisusa.com). b,c,d). 4-implant mandibular screw-retained prosthesis using straight and angulated multi-unit abutments.
Summary
The ability to retrieve a restoration is often cited as an advantage of screw-retained prostheses. Cemented-retained prostheses have been promoted to allow the restoration of mal-aligned implants. When needed, proper cementation technique must be used to avoid cement implant complication. It is always advisable to plan a screw-retained restoration whenever possible. When an implant angulation is present, an alternative to the cement-retained restoration is to use the Angulated Screw Channel concept, the lingual set of screws, and the multi-unit abutment restoration. Soft tissues may respond more favorably to screw-retained crowns when compared to cement- retained crowns.
The management of peri-implant disease is not yet fully investigated, the complexity of the etiology and the lack of a unified treatment modality make the treatment even less evident. Restorative treatment is part of the problem and new restorative guidelines should be established.
References
- Wadhwani C. Prosthetic options for Dental implants. Decisions in dentistry. 2016; 24-26. Ref.: https://goo.gl/zynSXs
- Dumbrigue HB1, Abanomi AA, Cheng LL. Techniques to minimize excess luting agent in cement-retained implant restorations. JPD. 2002; 87: 112-114. Ref.: https://goo.gl/efKXbg
- Wadhwani C1, Piñeyro A. Technique for controlling the cement for an implant crown: J Prosthet Dent. 2010; 102: 57-58. Ref.: https://goo.gl/SzDTBB
- Wilson TG. The positive relationship between excess cement and peri-implant disease: a prospective clinical endoscopic study. J Periodontol. 2009; 80: 1388-1392. Ref.: https://goo.gl/mxBZon
- Reznic J. Evaluation and management of common dental implant complications. Implant Practice. 8: 6: 36-42. Weber HP, Kim DM, Ng MW, Hwang JW, Fiorellini JP. Peri-implant soft-tissue health surrounding cement- and screw-retained implant restorations: a multi-center, 3-year prospective study. Clin Oral Implants Res. 2006; 17: 375-379. Ref.: https://goo.gl/xT8H2U
- Sherif S, Susarla HK, Kapos T, Munoz D, Chang BM, et al. A systematic review of screw- versus cement-retained implant-supported fixed restorations. J of Prosthodont. 2014; 23: 1–9. Ref.: https://goo.gl/CTG6At
- Urdaneta RA, Marincola M. The Integrated Abutment Crownä, a screwless and cementless restoration for the single-tooth implants: a report on a new technique. J Prosthodont. 2007; 16: 311-318. Ref.: https://goo.gl/bRE52e
- Urdaneta RA, Marincola M, Weed M, Chuang SK. A screwless and cementless Technique for the Restoration of Single-Tooth Implants: A Retrospective Cohort Study. J Prosthodont. 2008; 17: 562-571. Ref.: https://goo.gl/kMbVKv
- Berroeta E, Zabalegui I, Donovan T, Chee W. Dynamic Abutment: A method of redirecting screw access for implant-supported restorations: Technical details and a clinical report. J Prosthet Dent. 2015; 113: 516–519. Ref.: https://goo.gl/iQzbsa
- Clausen GF. The lingual locking screw for implant-retained restorations--aesthetics and retrievability. Aust Prosthodont J. 1995; 9: 17-20. https://goo.gl/xdD6Dx
- Daher T, Morgano SM. The use of digital photographs to locate implant abutment screws for implant-supported cement-retained restorations. J Prosthet Dent. 2008; 100; 3: 238-239. Ref.: https://goo.gl/Gp2A6F
- Gervais MJ, Hatzipanagiotis, Wilson PR. Cross-pinning: the philosophy of retrievability applied practically to fixed, implant-supported prostheses. Aust Dent J. 2008; 53: 74-82. Ref.: https://goo.gl/FePySz

